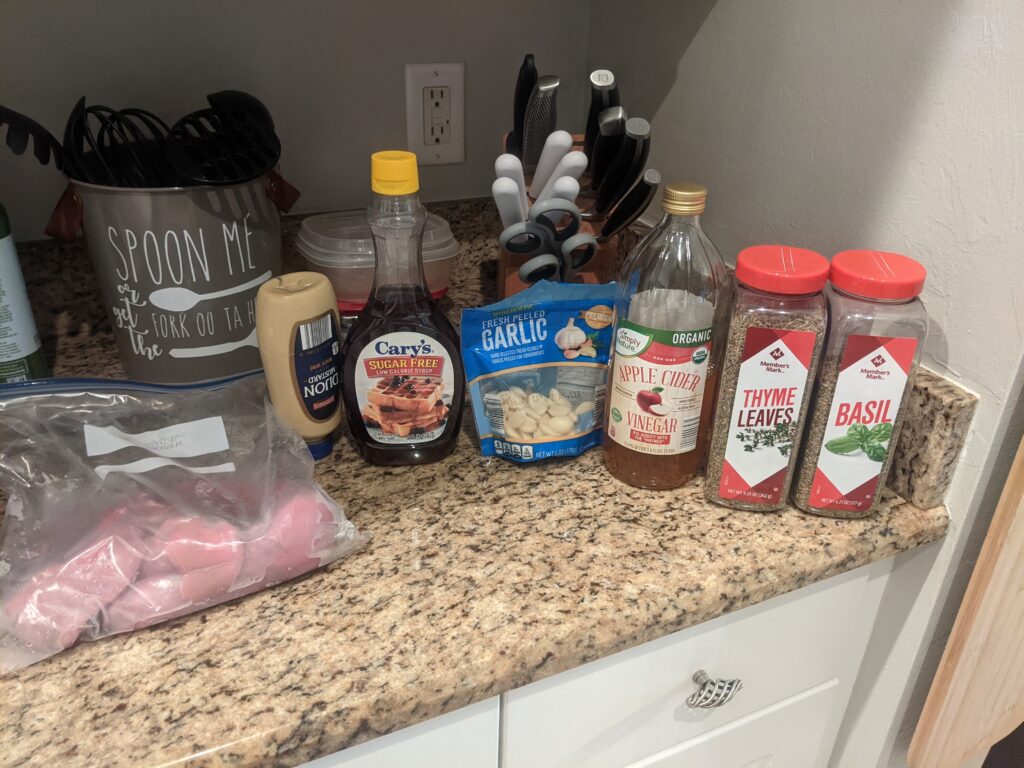
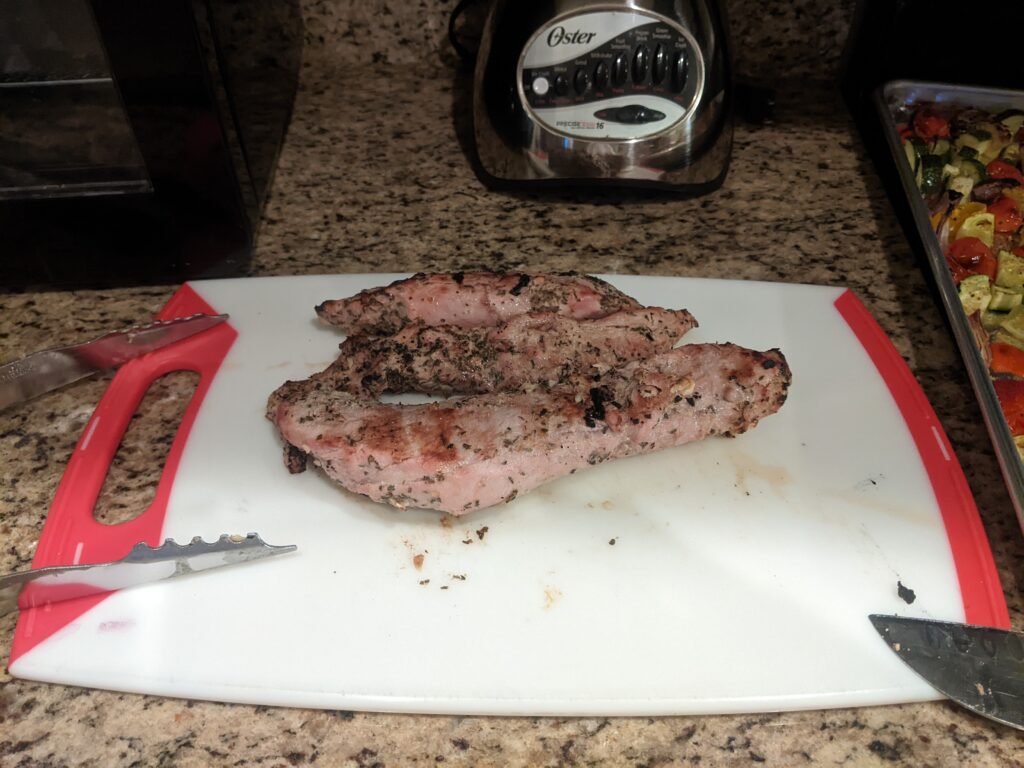
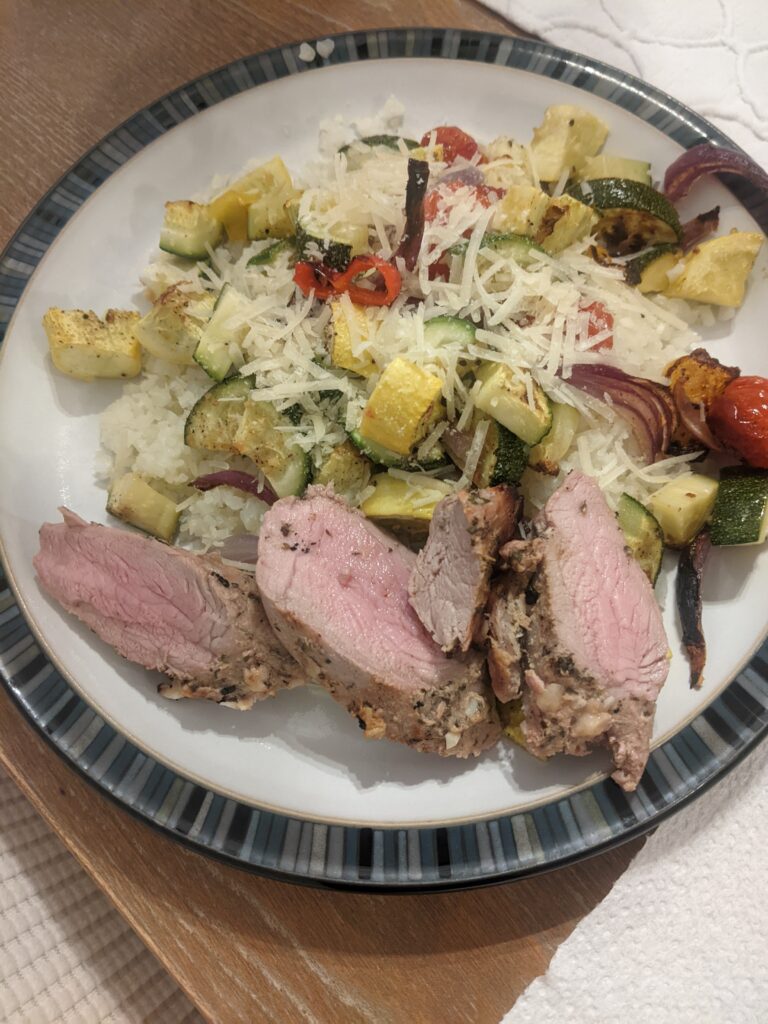
This marinade became a fast favorite in my home. Apple Cider Dijon Pork Tenderloin is a weekly staple in our healthy repertoire. We’ve expanded the marinade for use with chicken and turkey tenderloins as well. It’s delicious on grilled or baked proteins. It’s also incredibly easy to put together in a time pinch. I usually marinade the pork for about an hour before we cook it.
Ingredients:
2 pork tenderloins trimmed and silver skin removed
2 TBSP apple cider vinegar
2 TBSP sugar free syrup
1 TBSP Dijon mustard
3-5 cloves chopped garlic
2 tsp each fresh or dried herbs – pick 2 each time, I’ve tried all the combos and they are all delish (Thyme, Basil, Rosemary, Oregano)
Combine all ingredients in a large sealable bag. Shake and move around until the pork is well coated with the marinade. Let sit at room temperature for 30 min – 1 hour before grilling or baking to desired degree of doneness.
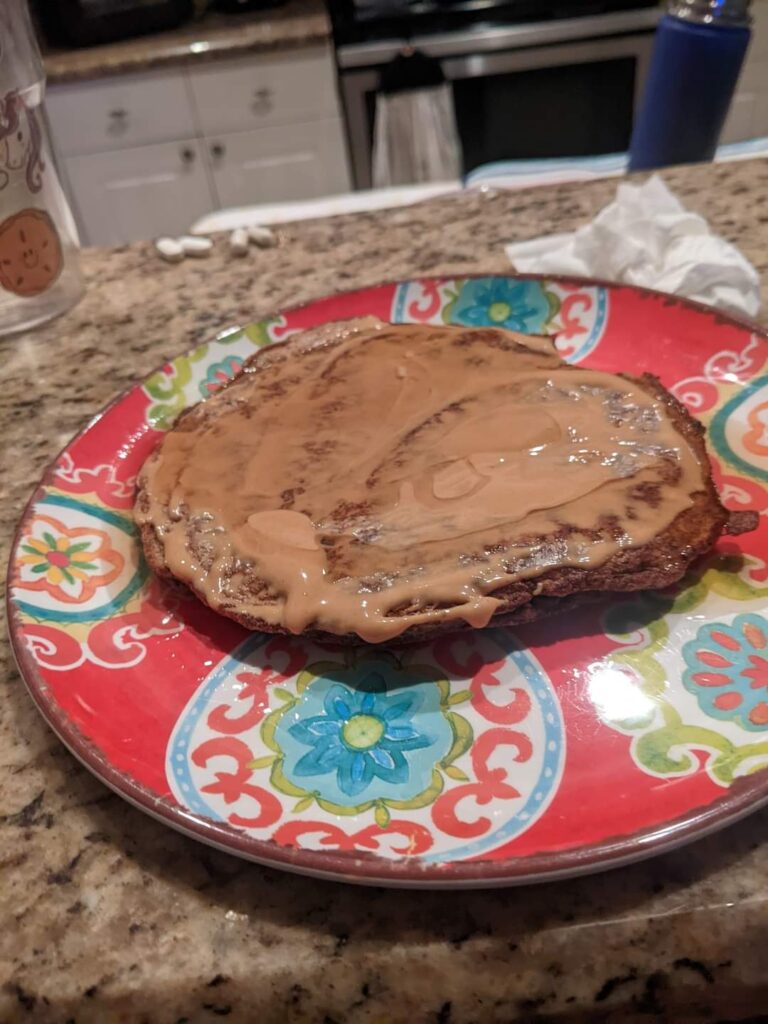
I go to bed excited about the next morning when I know I have a Chocolate Granola Pancake waiting for me! How can something so delicious also be so nutritious? Careful selection of the ingredients and ensuring portions meet your macro meal planning numbers ensures the nutritious efficacy of this TASTY breakfast staple! See original breakfast pancake for base recipe.
Ingredients:
3/4 cup egg whites
1/2 cup Simply Nature Coconut Cacao or Dark Chocolate Sea Salt Granola (found at Aldi) **Note: any other granola may be substituted – aiming for 20 g of carbs per 1/2 cup serving**
1 scoop Super Seed Beyond Fiber
Directions:
Heat a frying pan over medium heat. Meanwhile in a small mixing bowl, whisk together all ingredients. Batter will be lumpy due to the granola. Spray the pan with non-stick cooking spray. Pour in the batter, be careful not to the let the batter sit too long as the fiber powder will cause it to thicken greatly. Cook the Chocolate Granola Pancake until it’s easy to slide a spatula underneath the pancake, usually 4-6 minutes. Flip the pancake and cook another 1-2 minutes.
I like to make a stack of the pancakes on the weekend, wrap each meal in tinfoil, and store in the refrigerator for fast breakfasts on weekday mornings. Pancake as pictured is topped with 1 TBSP natural smooth peanut butter and 2 TBSP sugar free syrup.
Approximate nutrition facts (per pancake with peanut butter topping): 395 calories , 16 g of fat, 33 g of carbs, 33 g of protein
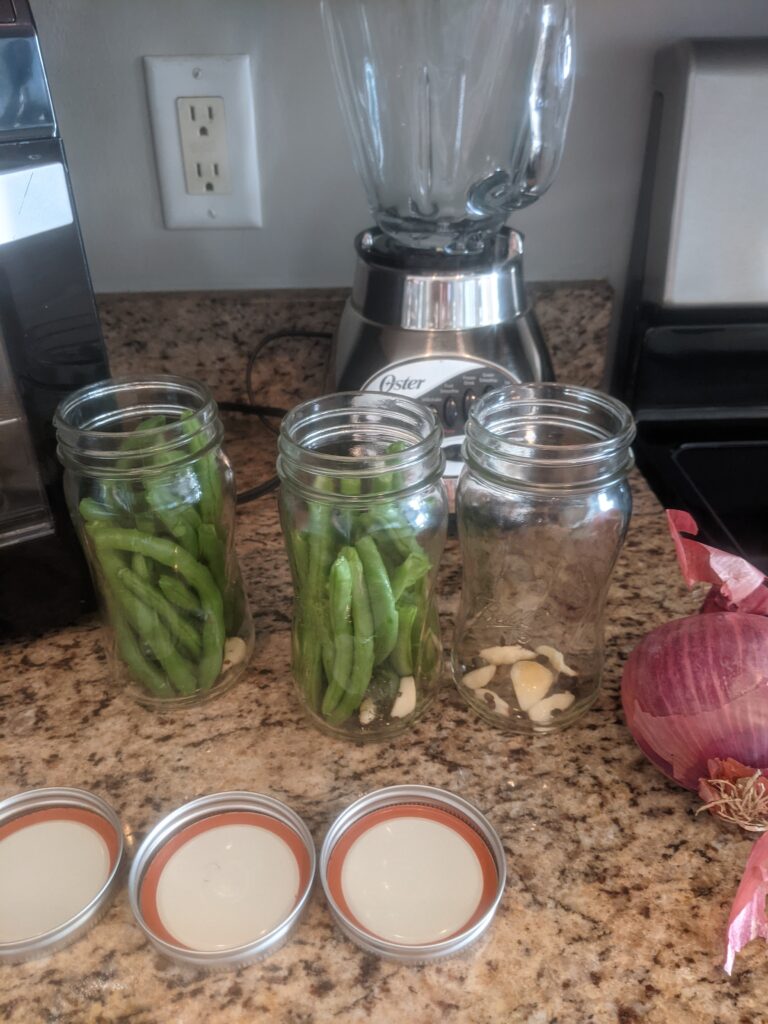
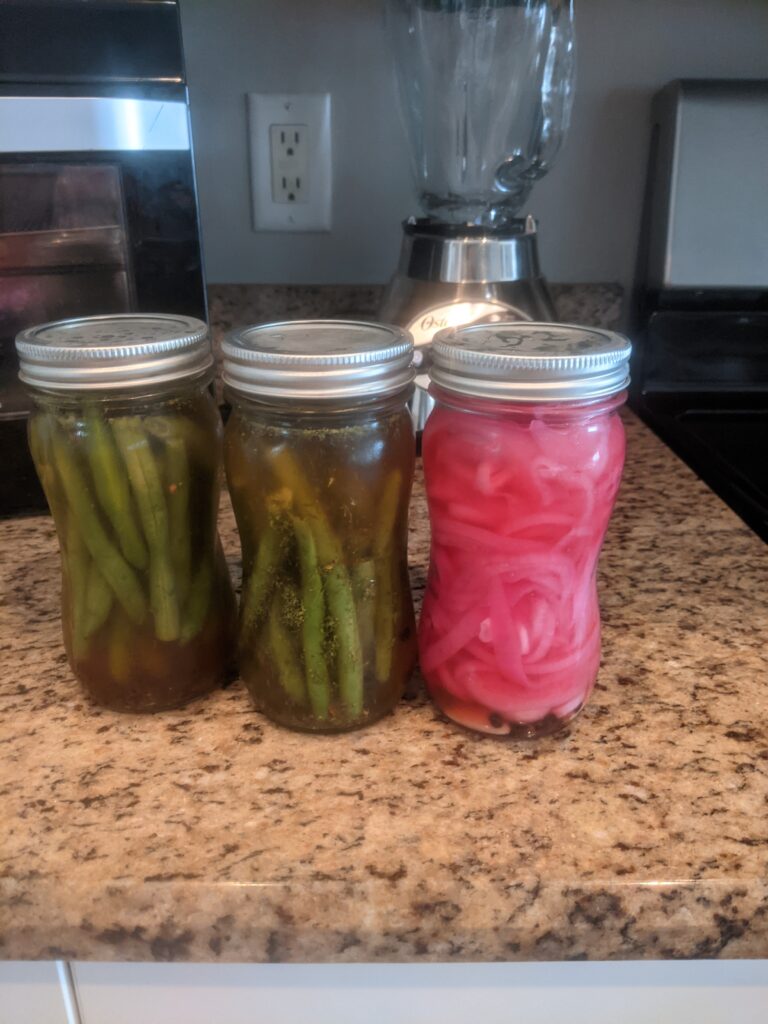
I’ve never been a big fan of pickles (unless they were deep fried ;0), but pickled green beans and red onions have my taste buds singing! I was introduced to pickled green beans by a dear friend of mine who produced the most epic charcuterie board one evening for a get-together. I became obsessed and quickly looked up recipes. After a little trial and error I found an easy, healthy, and quick way to create pickled green beans. Of course, I couldn’t stop there and expanded my recipe to also include red onions. Now, I always have a jar or two in the fridge of both pickled green beans, red onions, cucumbers and asparagus. The recipe works for almost any vegetable. Once pickled, they make amazing toppings on salads, healthy additions to charcuterie boards, or just a quick nibble when you’re between meals and hunger is kicking in.
Ingredients:
A few large handfuls of green beans (ends trimmed or snapped off)
1 medium to large red onion sliced thin and layers separated
3 cups of water
2 cups of apple cider vinegar
3 TBSP salt
2 TBSP Swerve, Stevia, Truvia, etc. (zero calorie sugar substitute)
garlic cloves
peppercorns
dried red pepper flakes
dried dill (fresh is fine too but I find the dried gives better flavor)
Here’s how I set everything up:
Line up three mason jars. Place a few garlic cloves and peppercorns in all three jars. In two of them add red pepper flakes (1 tsp) and dried dill (1 tsp). I just eyeball the measurements, it doesn’t matter if its not exact. The two that have all the goodies get the raw, trimmed green beans placed in them. The jar with just the peppercorns and garlic will be for the red onion. You can also add an additional tsp of sugar substitute to the red onion jar if you like them a little sweeter.
Over medium high heat, bring the water, vinegar, salt and sugar substitute to a boil. Once this mixture boils, remove from heat and place the sliced and separated red onion in the liquid for about one minute. Use tongs to remove and place directly into the remaining third jar. Let the liquid cool for a few minutes then pour over the vegetables in all three jars. This recipe should yield enough to do 3-4 jars total. Make sure the green beans and red onion are completely covered. If you added more sugar to the onions, shake this jar up so the sugar dissolves.
The pickled veggies will taste great by the next day. If you can wait 2-3 days they’ll be even better. So far they’ve not made it in my fridge longer than 1 week because we eat them so fast, but given the other recipes I had explored I believe they should hold up for a couple of weeks.
Cooking is my passion and healthy cooking is my mission, 70-80% of the week anyway! Check out my plethora of ideas to help inspire your healthy eats.
*The exact portions will vary per person. Contact us for more details on your portions and macronutrient breakdown per meal/per day! There is no need to guess at how you should eat – let us help you eat right for your body type and goals!
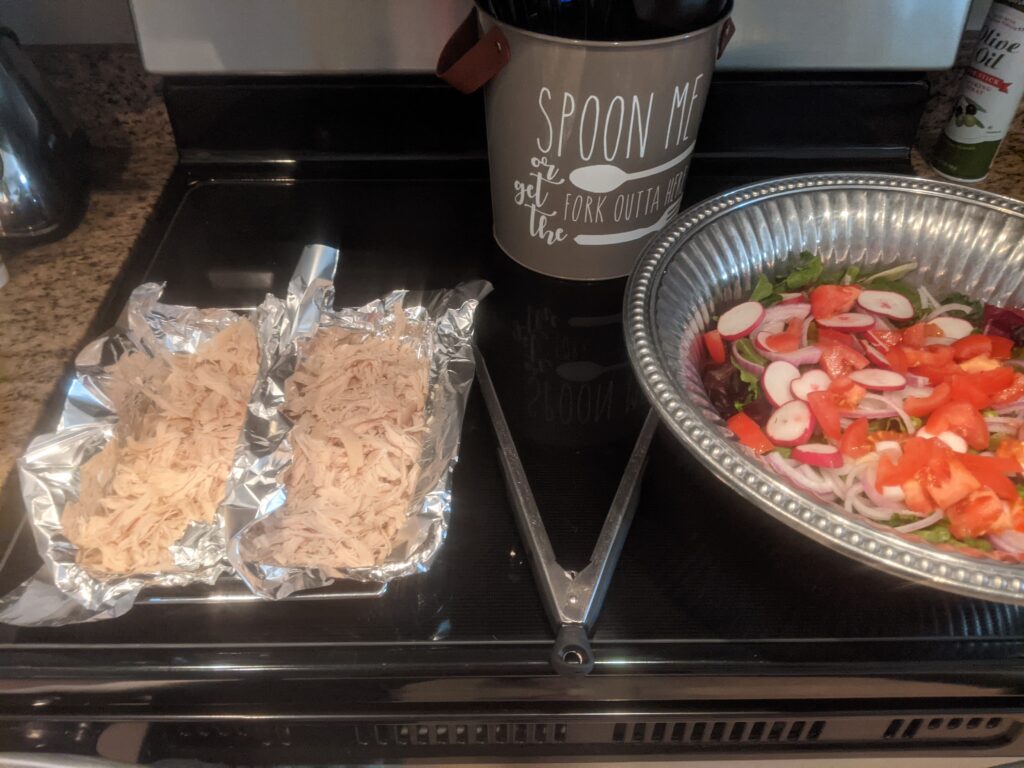
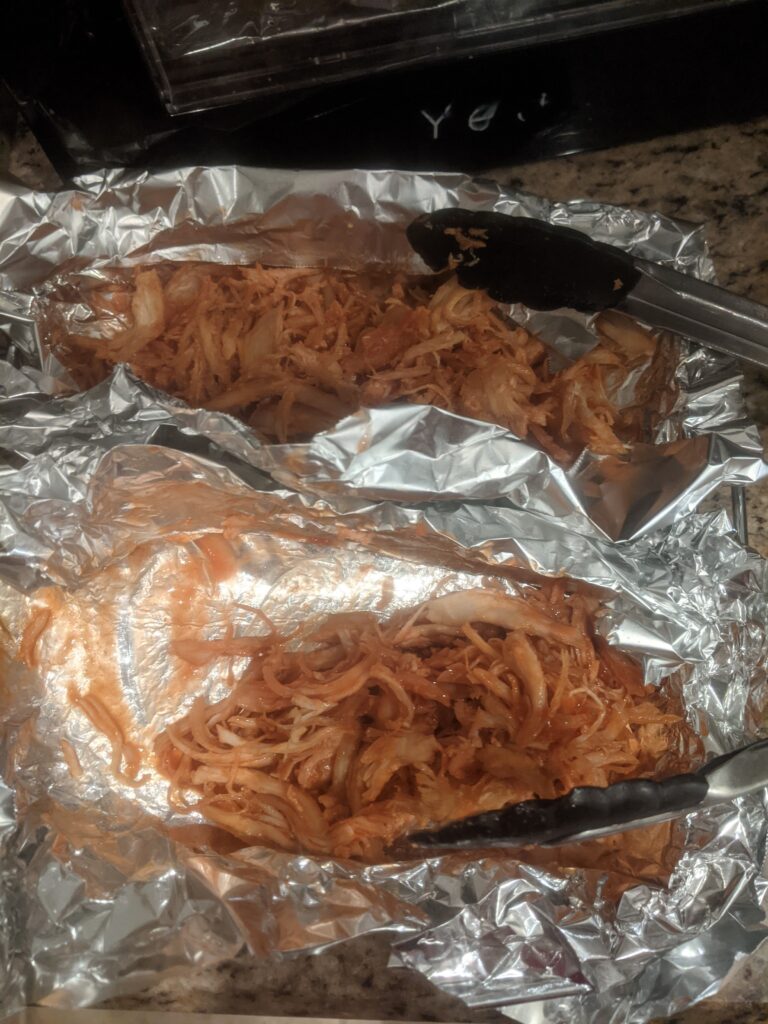
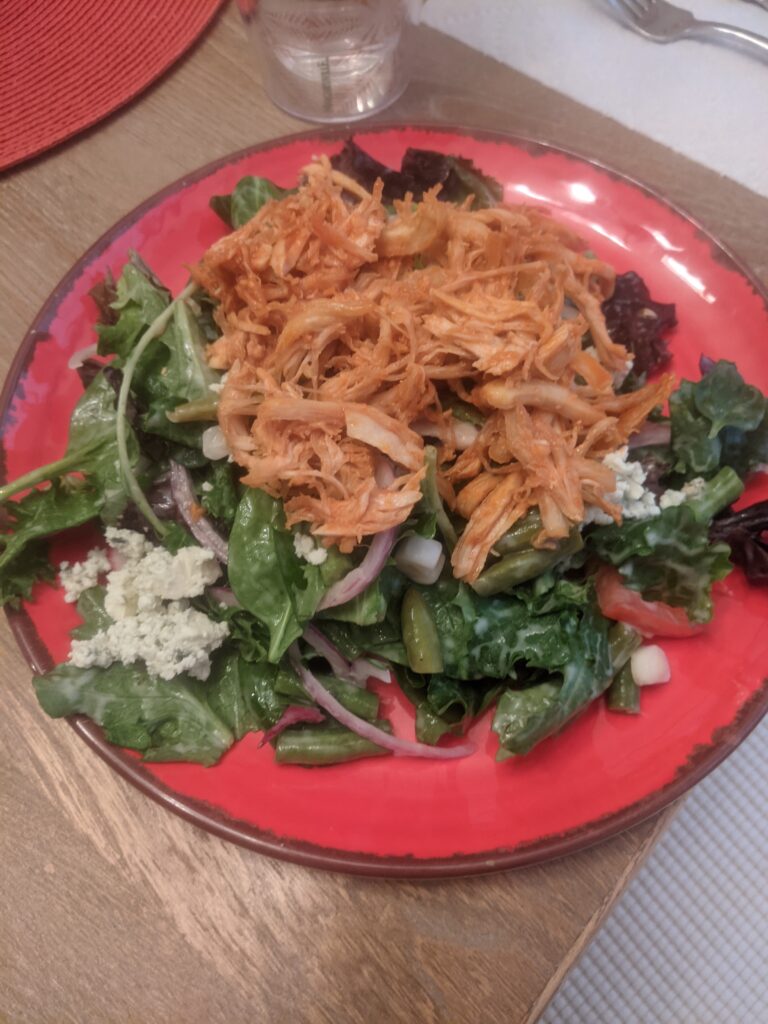
Some healthy foods taste healthy. Some healthy foods taste borderline naughty. My Buffalo Chicken Salad is one of the latter. I created it one Sunday late morning while attempting to nurse a hangover without blowing my macro based meal plan. The flavors are bold! If you like buffalo chicken wings, blue cheese, and ranch, you are going to love this Buffalo Chicken Salad. Let’s put it all together.
Buffalo/hot sauce – just plain hot sauce, not the stuff mixed with butter
Here’s how to make the magic happen while following your meal plan:
Measure your chicken and chop or shred it. Place on tinfoil and into air fryer. Crisp for 6-10 minutes on 350. Remove and top with hot sauce. Caution: a little goes a long way – if you like heat, load it up!
Prepare your salad in a large bowl. Add greens/lettuce, chopped tomatoes, peppers, chopped pickled green beans, and pickled red onions.
Measure your dressing to keep the macros in line. Remember you’re adding 1 oz of blue cheese crumbles per serving too so you want to make sure your fat allotment stays in check.
After you’ve dressed your salad, add the measured cheese, and top with your crisped chicken portion.
This Buffalo Chicken Salad is so good, perfect for a week night meal when you need that taste of naughty but it’s not quite time yet, perfect for a hangover cure, really just perfect! I hope you enjoy it as much as I do!
For more recipe ideas that will keep your healthy cooking tasting like so much more than healthy cooking, visit our Healthy Eats index.
*The exact portions will vary per person. Contact us for more details on your portions and macronutrient breakdown per meal/per day! There is no need to guess at how you should eat – let us help you eat right for your body type and goals!
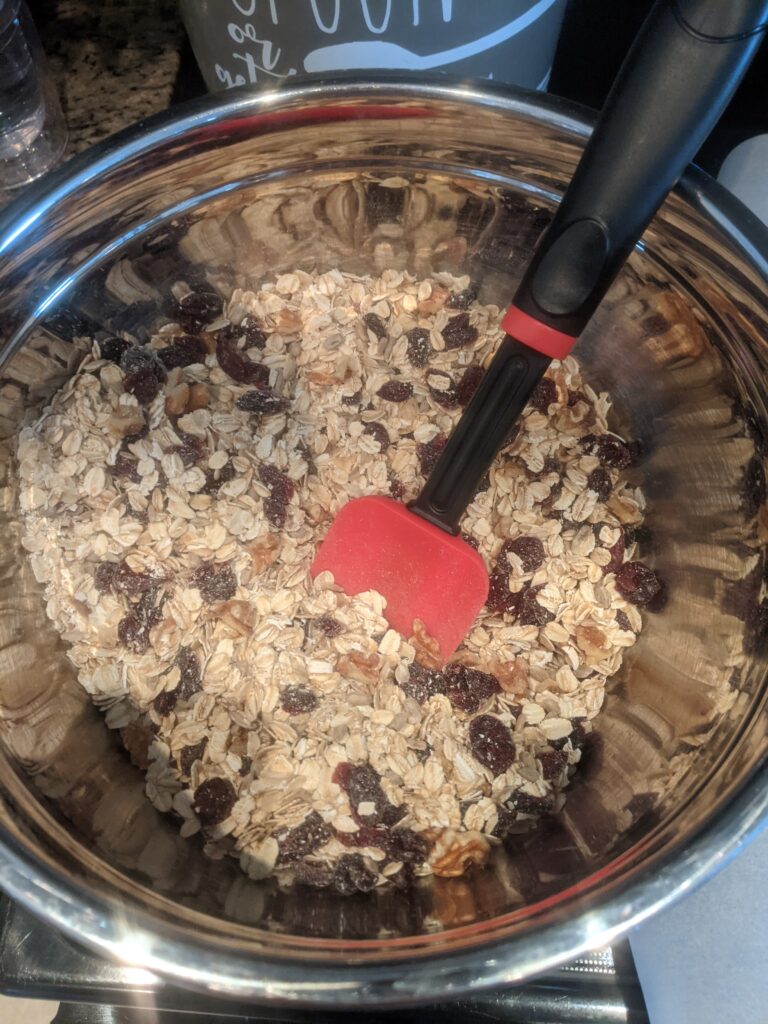
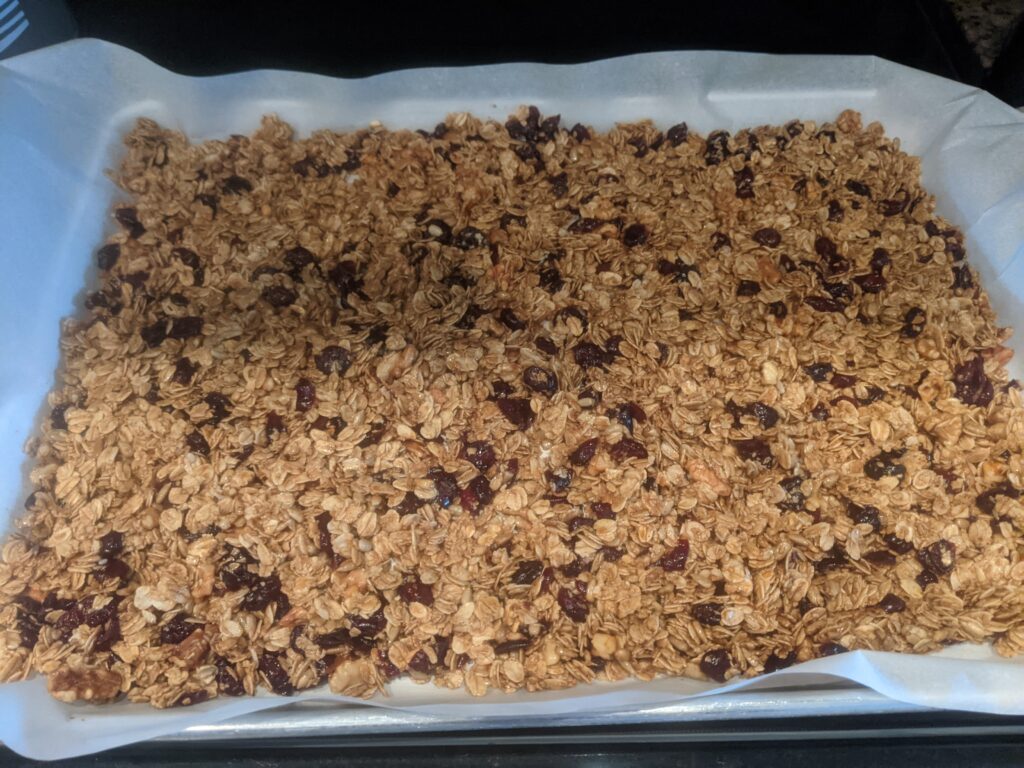
The smell of fall in the middle of spring? That’s what you can expect when you toast up this incredibly healthy homemade granola! Clusters of toasted oats, delicious pecans and juicy dried cranberries come together with pumpkin pie spice to form a scrumptious breakfast or post workout carbohydrate. The main benefit of homemade granola is you can control the sugar/sweetness and therefore the total carbohydrates. Store-bought varieties often pack upwards of 50g of carbs in only 1/4-1/2 cup, whereas my Cranberry Pecan Granola has only 25 g of carbs in 1/2 cup! Here’s how to put this tasty treat together:
Ingredients:
3 cups old fashioned oats
1 cup dried cranberries
1/2 cup pecans (or walnuts work well too)
2/3 cup unsalted sunflower seeds
3-4 large egg whites (or approx 2/3 c liquid egg whites)
1/4 cup molasses
1/4 cup agave nectar
2 TBSP pumpkin pie spice (or make your own by mixing together cinnamon, ground ginger, ground cloves & nutmeg – just eyeball the ratios but cinnamon should be the largest portion)
Preheat the oven to 300 degrees. This is a low and slow kind of deal! In a large bowl whisk the egg whites until they are nice and frothy. Add in the molasses, agave nectar and pumpkin pie spice and stir until combined. Add the oats, cranberries, pecans, and sunflower seeds and toss until evenly coated.
Spread on a parchment lined large baking sheet so that the cranberry pecan granola is spread as thin as possible. Bake in 15 minute increments, stirring each time. The granola should be perfectly toasted right around 1 hour (give or take depending on your oven). Let it cool completely before moving to a plastic bag or container.
Nutrition: 1/2 cup = 161 calories, 24.3 g carbs, 5.5 g fat, 4.5 g protein
This incredibly healthy granola tastes amazing and compliments your protein shake perfectly for a post workout carbohydrate or as a side next to your eggs with breakfast. *The exact portions will vary per person but there is no reason to guess at how much granola you should eat or what you should eat with it! Contact us for more details on your portions and macronutrient breakdown per meal/per day!
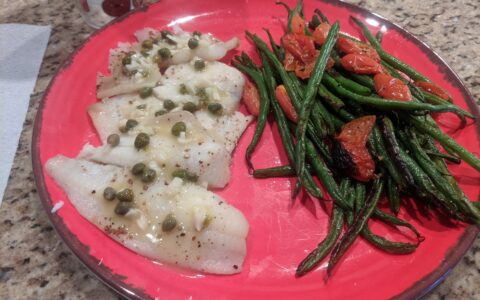
Mmmmm can’t you just taste it? Chicken or fish piccata from your favorite Italian restaurant – that rich lemon, butter and wine flavor with the salty capers and yummy garlic – my mouth waters just thinking about it! Would you believe you can have those tasty flavors and keep your macros in check? It can be done, I’ll show you the way…
For starters, this is just frozen wild caught flounder. After thawing it in the refrigerator, I washed each piece and patted dry with paper towels. Then I placed the fish in a single layer on a tinfoil lined baking sheet. Just a little sprinkle of salt, pepper and garlic powder on each piece and under the broiler it went for about 7-8 minutes.
For the piccata sauce:
1.5-2 TBSP Yogurt Butter (I like Brummel & Brown brand)
3-4 Small cloves of garlic minced
2 TBSP Capers
The juice of two lemons
In a medium saucepan, melt the yogurt butter and garlic together over low to medium heat. Let the garlic cook for a few minutes. When you can really smell the garlic and butter is completely melted, add in the capers and lemon juice. Sauce will thicken up slightly as you let it heat together. After a few minutes remove the piccata sauce from the heat.
Place your fish portion on your plate and generously add some of the healthy Piccata sauce.
*The exact portions will vary per person based on your macronutrient needs. Contact us for more details on your portions and macro breakdown per meal/per day!
There are so many ways to make healthy food taste great. All of our recipes have been created, tweaked, and taste approved by us! Try them here.
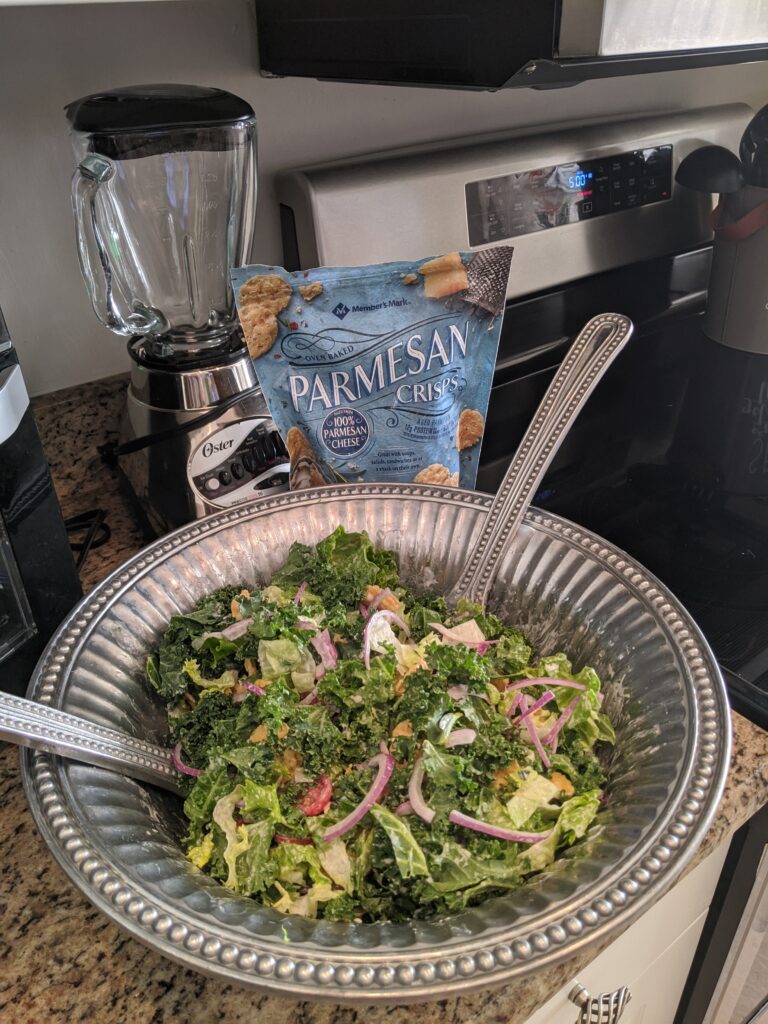
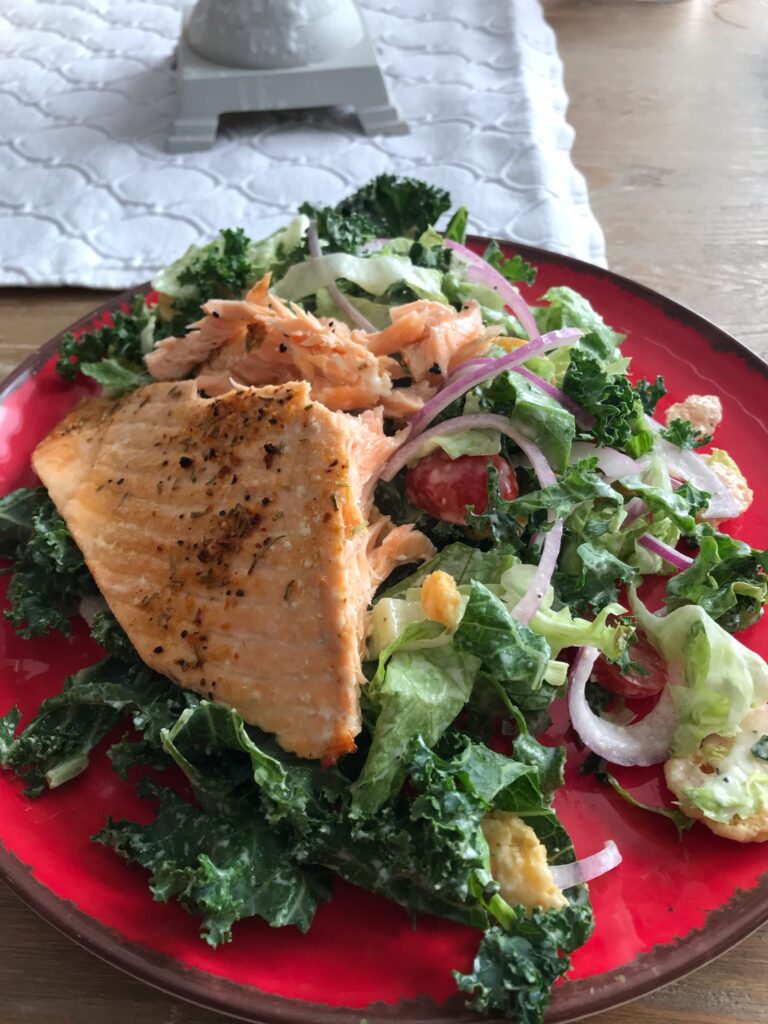
We’ve all heard the news or seen the unbelievable info on a menu that discloses nutrition facts: salads can be worse for us than a burger and fries! How is that possible? A salad, full of lettuce and healthy ingredients, can hold more calories, fat & carbs than a decadent burger and fries!?$!. Well it’s all in the salad accoutrements. Yep, those pecans, dried cranberries, blue cheese, and that amazing balsamic vinegar dressing can add up quickly. The trick is to understand which macronutrient each topping is accounting for in your meal. Having nuts, cheese, and dressing is likely giving your salad 3x the desired fat portion. Adding dried fruit seems harmless but did you know in just 1/4 cup of dried cranberries there’s more than 30 grams of carbs? That’s equivalent to 2 slices of bread! So how can we scale a salad back while still keeping the flavor and filling feeling it gives us? Start with the greens, carefully decide what toppings are going on and which of the macronutrients they account for. Let’s look at reconstructing a delicious and popular salad – the Salmon Caesar Salad.
As I mentioned, let’s start with the greens. Here we’re featuring 60% chopped kale and 40% chopped romaine. These percentages are ballpark of course and truly the lettuce you choose doesn’t really matter. All lettuce is healthy for you and has almost no calories so fill that bowl with the green stuff! Then in this particular salad for additional vegetables, I’ve added sliced red onion & halved cherry tomatoes. You could add bell peppers, sliced mushrooms, or any other “approved” vegetables. Here comes the yummiest part…have you tried the “Parmesan Crisps” that carb-free and have nearly equal parts fat and protein? They are beyond tasty and texture is fantastic. In this reconstructed Salmon Caesar Salad, the Parmesan Crisps are serving as the cheese and the crouton because of the awesome crispy, crunchy texture that even holds up to dressing. So let’s talk about the dressing…Caesar dressing is not known for it’s low-cal/low-fat nature. We can fix that. Across this whole bowl of salad, I used just a single serving of the dressing (2 TBSP) then I squeezed in the juice of 1 big juicy lemon. This thins out the dressing and stretches a small amount of dressing through a huge bowl of salad. Without further ado, add your grilled salmon (portion appropriate to your meal plan macro needs), and voila, the most incredible reconstructed, healthy Salmon Caesar Salad! Buon Appetito!
Ingredients & Prep:
4-6 cups leafy greens – featured here is kale and romaine
1/2 red onion thinly sliced
1/2 cup halved cherry tomatoes
1-2 lbs of wild salmon (salt, pepper, rosemary)
24 Parmesan crisps
2 Tbsp Caesar Dressing
1 lemon (juiced)
Wash and dry all greens. Place in a large bowl. Season salmon and prepare on the grill or in the oven. *Don’t add any additional fat such as olive oil* Place tomatoes and onions on the lettuce. Add the Parmesan Crisps, dressing and lemon juice. Toss to coat evenly. Portion 2-3 cups per plate and add salmon portion.
It’s crucial to have a plan for your meals. Decide which macronutrient each part of your meal is fulfilling. Get your portions and macros “in check”. We can help make sure you’re following a plan designed for your optimal results, after-all, abs are made in the kitchen – get in there and cook! Try our other tasty healthy EATS by clicking here.
*The exact portions will vary per person.Contact us for more details on your portions and macronutrient breakdown per meal/per day! There is no need to guess at how you should eat – let us help you eat right for your body type and goals!
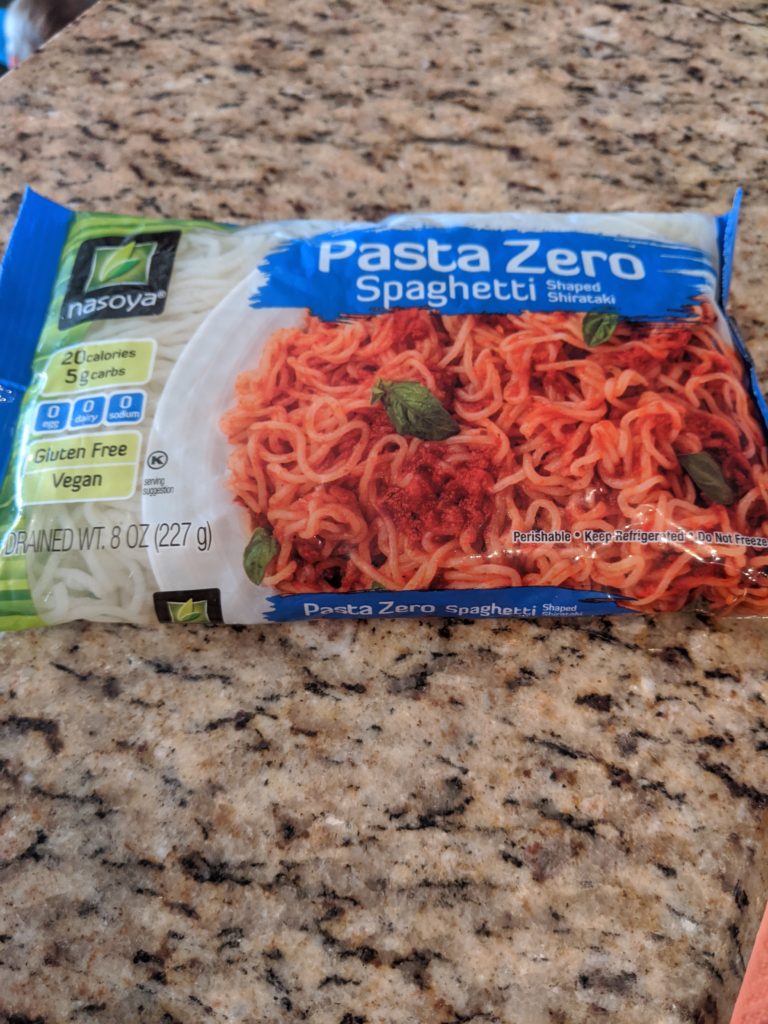
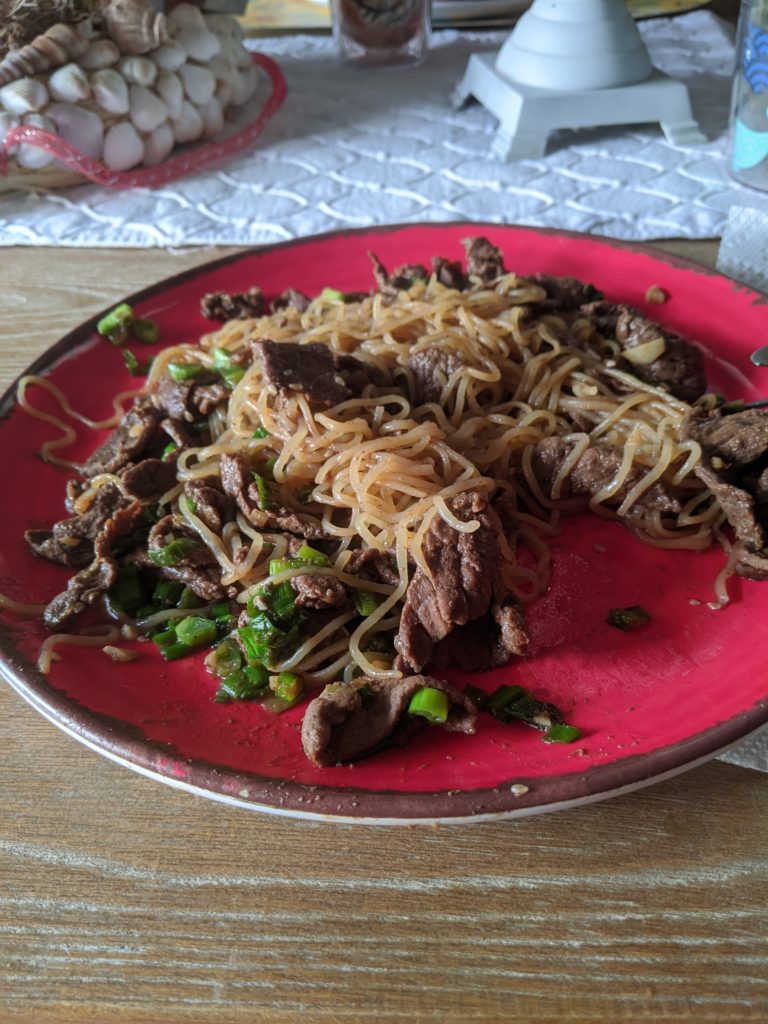
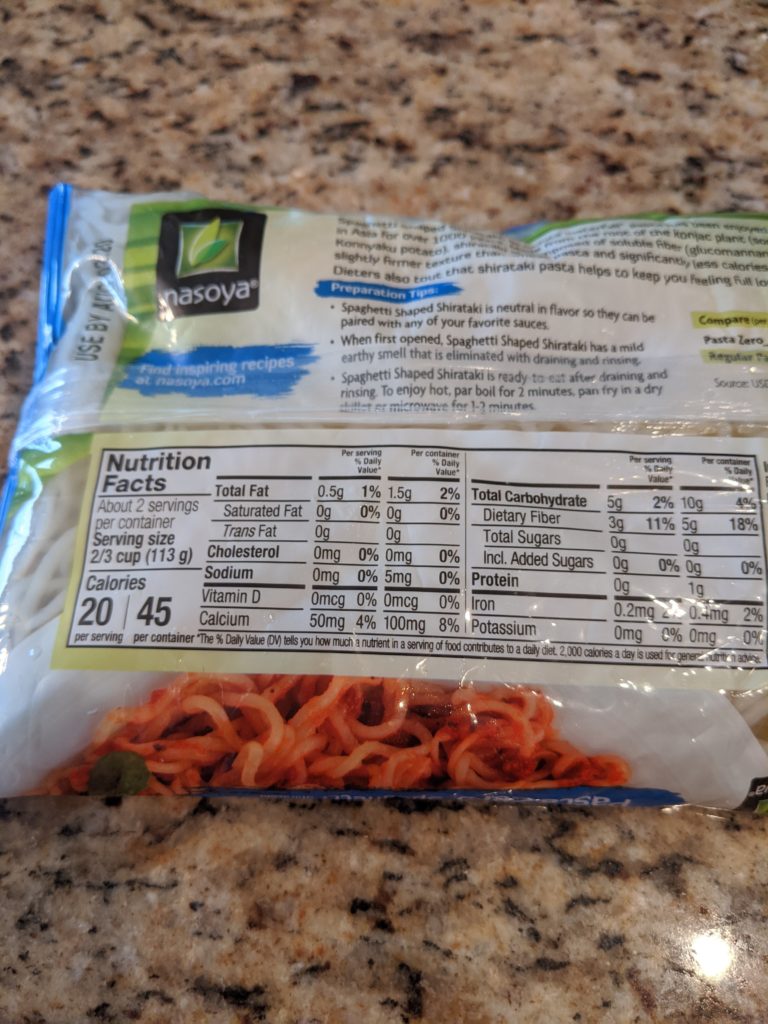
So actually I used bison in this Mongolian Beef recipe, but of course beef or elk would be great too. We love the grass-fed quality red meat we get from Northstar Bison. In addition, I used “Zero Pasta”. You can find this scientific gift to pasta lovers in the Vegan cold section of your grocery store – where they also keep the tofu for those of you not familiar with this section of the store! The texture on this pasta is awesome and its a great vessel to soak up some yummy sauces. See also my cold peanut noodle salad recipe featuring this awesome pasta nearly free of carbs and calories!!
Ingredients:
2 packages of “Zero Pasta” found in cold vegan section of your grocery store
1 lb grass-fed beef, bison or elk (I like to slice it really thin when its still frozen)
2 TBSP vegetable stock
2-3 cloves of chopped garlic
2 tsp fresh minced ginger (or ground ginger if you don’t have fresh)
1/3 cup of low-sodium soy sauce
1 TBSP calorie free sweetener (like Stevia or Truvia)
1 TBSP sugar free maple syrup
2 TBSP Hoisin Sauce
1/2 – 1 tsp of chili garlic sauce (depends how spicy you want it)
4 green onions diced
So while your bison is still frozen, slice it really thin with a sharp knife. It should almost look like beef shavings. Let it rest on the cutting board, defrosting as you prepare the other ingredients.
In a bowl, combine the ginger through chili garlic sauce with a whisk. Drain your “Zero Pasta” in a colander over the sink.
In a large saucepan, heat the vegetable stock over high heat with the chopped garlic. When they stock starts to boil, add in the bison (or beef) and cook until nearly done. It will take just a minute or two since it’s sliced so thin. Then add in the prepared sauce and finish cooking the bison. Remove from heat. Use tongs to toss the “Zero Pasta” and diced green onions into the beef.
Based on the amount of ingredients the Mongolian Beef (bison) dish should make 2 portions if divided in half. I’m not usually so lackadaisical about measurements but this is one of those recipes where the sauce is so much better when added to the meat and finished on the stove! So your portion will be a bit eye-balled here but the ingredients are healthy and meal plan approved. You’ll be close!
*The exact portions will vary per person. Contact us for more details on your portions and macronutrient breakdown per meal/per day! There is no need to guess at how you should eat – let us help you eat right for your body type and goals!
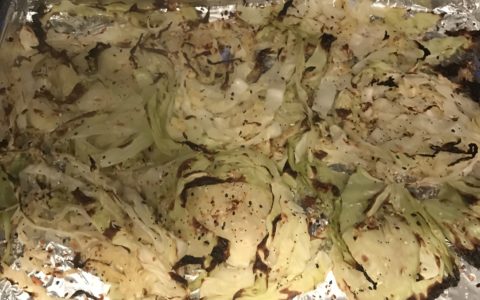
I first discovered Cabbage Steaks when I was making a delicious St. Patty’s day dinner for hubby and me. I needed a nice side dish to compliment my corned beef hash. The recipe I found for cabbage steaks brushed both sides with oil, topped with salt, pepper and garlic and roasted in the oven. They were delicious and an immediate hit in our house.
Since macro-based meal planning is what we do and how we eat, I decided to remove the oil from the cooking process and hoped the cabbage steaks would still be delicious. Spoiler alert – they were! So now we make the cabbage steaks sans the oil, just a little cooking spray on the pan. The rest of the process is similar and the cabbage is a staple a few nights a week.
Here’s how to roast up your very own meal plan approved cabbage steaks:
Preheat oven to 400 degrees
Pick a nice medium head of cabbage from the store. Remove the outer layers of loose leaves (usually one to two layers should do it).
Slice the cabbage into 3/4 – 1 inch “steaks”.
Spray cooking spray on foil or parchment lined baking sheet. Then place cabbage steaks on the sheet.
Generously add seasoning. We’ve tried many different combinations. Simple salt, pepper and garlic is perfect, or pictured here is “everything but the bagel” seasoning. You really can’t go wrong – be creative and let me know of any winning combinations!
Add cabbage steaks to the oven and set your timer for 25-30 minutes. Use tongs to flip the cabbage steaks over and lightly re-season the new side of the steaks. They may lose a little of their “steak shape” once flipped. That’s okay – they will still taste incredible!
Return to the oven for another 15-20 minutes. You may want to broil the cabbage steaks at the very end to get a little color on them.
The cabbage steaks have a buttery taste to them and are so amazing with turkey meatballs. We hope you’ll like this recipe as much as we do.
There are two main reasons to avoid cooking with oil:
The composition of oil changes when its heated up and toxins can be released depending on the boiling point of the oil
It’s hard to know how much oil is in your portion of food once the dish is finished. Keeping close watch on your fats, carbs, and proteins is very important in macro-based meal planning.
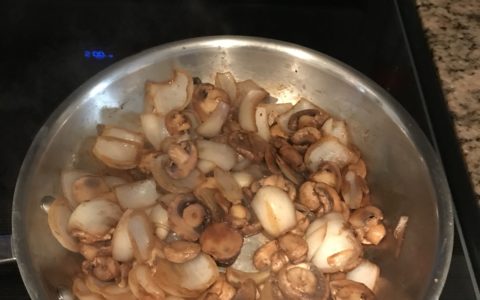
I get asked often how to saute vegetables without adding oil. It’s simple really, add other things that aremeal plan approved. In this dish – Sauteed Onions and Mushrooms – I use soy sauce, balsamic vinegar and Worcestershire sauce. That’s it – no salt, no pepper – nothing else! These veggies are an amazing topper to steak, ground beef, grilled chicken, salad, etc. The flavor is rich and delicious, you won’t miss the oil one bit!
Here’s how I prepare the Sauteed Onions and Mushrooms. First chop your large onion into medium size wedges then separate each layer. Next slice your mushrooms or buy the pre-sliced mushrooms and simply open the pack! Place onions and mushrooms in the saute pan and add your liquids. I add approximately 1 TBSP each of balsamic vinegar and soy sauce and about 1/2 TBSP of the Worcestershire sauce (for one large onion and one regular size pack of sliced Portabello mushrooms). Then turn your pan on to high heat. You’ll saute until the liquid is pretty much gone and the mushrooms and onions have a nice golden brown color to them. It should take about 6-8 minutes total on high heat.
The Sauteed Onions and Mushrooms are so easy to make and truly delicious. Add them to your healthy cooking this week!
We create our recipes and fine tune them for macro-based eating that tastes great too! For additional Healthy EATS, click here!
*The exact portions will vary per person. Contact us for more details on your portions and macronutrient breakdown per meal/per day!